It's easy to make earrings using beads, head pins, and bead caps. In fact, it's one of the first basic designs that beginners learn. It's a little more challenging to use those same materials to make earrings that don't look like everyone else's. Here are two easy ideas to alter your basic bead caps.
POLKA DOT PASSION
Add a playful touch to your design with these polka-dotted bead caps.
MATERIALS:
2 green 12mm vintage faceted glass rounds
2 rosy ox 12mm bead caps [chocolate ox version: chox06346]
2 copper kidney wires [similar: ear18]
2 copper 4mm rounds
2 copper 3mm daisy spacers
2 brass 2" head pins
TOOLS:
2 pairs of chain- or flat-nose pliers
Round-nose pliers
Metal hole-punch pliers
Wire cutters
Permanent marker (optional)
Finished size: 2 3/4"
1: Use the flat-nose pliers to gently bend the bead cap petals back halfway. Use the metal hole-punch pliers to punch 2-3 holes in each petal. For precise placement, you may wish to use a permanent marker to mark the spots to punch.
2: Use the head pin to string 1 copper round, 1 green round, 1 bead cap, and 1 daisy spacer; form a wrapped loop.
3: String the wrapped loop on 1 kidney wire. Use the flat-nose pliers to gently squeeze the loop on the kidney wire shut to secure the bead.
4: Repeat Steps 1-3 for the second earring.
Here are the finished earrings:
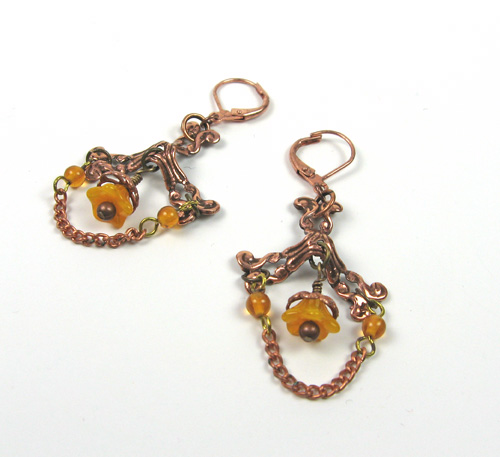
SUNSHINE SWING
I love chandelier-type earrings, but sometimes those specialty findings can be a little pricey. Here's one way to create your own.
MATERIALS:
2 copper size 11 seed beads
2 3/4" of vintage 4mm beaded/copper 2x3mm curb chain
2 rosy ox 8x15mm filigree bead cone caps [cap48]
2 rosy ox 8mm filigree bead caps [cap79]
2 yellow 8x6mm Czech pressed-glass flowers
2 copper 3mm jump rings
2 copper 6mm jump rings [similar: jump25]
6 brass 4mm jump rings
2 copper lever back ear wires [similar: ear7]
2 brass 2" head pins
2 copper 4mm rounds
TOOLS:
2 pairs of chain- or flat-nose pliers
Round-nose pliers
Wire cutters
Finished size: 2"
1: Use the flat-nose pliers to gently bend the bottom half of the cone bead cap petals so that they are flat.
2: Use one 6mm jump ring to attach one of the three bead cap sides to one 3mm jump ring. Attach the previous 3mm jump ring to 1 ear wire.
3: Use the pair of chain- or flat-nose pliers to gently open one of the beaded links of the chain to separate it from the rest of the chain. You should have a chain approximately 1 3/8".
Tip: If you do not have beaded chain, you can easily make your own by making a simple loop with wire, stringing 1 bead, and making a second simple loop that attaches to one end of 1-2" of chain. Repeat, alternating bead links and chain until you reach your desired length.
4: Use one 4mm jump ring to attach one end of the chain to the left side of the bead cap. Repeat for the right side.
5: Use 1 head pin to string 1 copper round, 1 yellow flower, 1 filigree bead cap, and 1 seed bead; form a wrapped loop.
6: Use one 4mm jump ring to attach the wrapped loop to the center loop of the bead cap.
7: Repeat Steps 1-6 for the second earring.
Here are the finished earrings:
ABOUT THE ARTIST
Michelle Mach is a jewelry designer, editor, and writer. More than 100 of her original jewelry designs have appeared in magazines including Stringing, Creative Jewelry, Easy Wire, BeadStyle, Bead Trends, and Beadwork. She loves sharing her creative tips and hosting design challenges. Visit her blog or her Etsy shop.
Would you like to design a project for our website? All designers will get full credit, links to their website and a gift certificate to spend any way they like at B'sue Boutiques website. Contact B'sue for details at
[email protected]


